
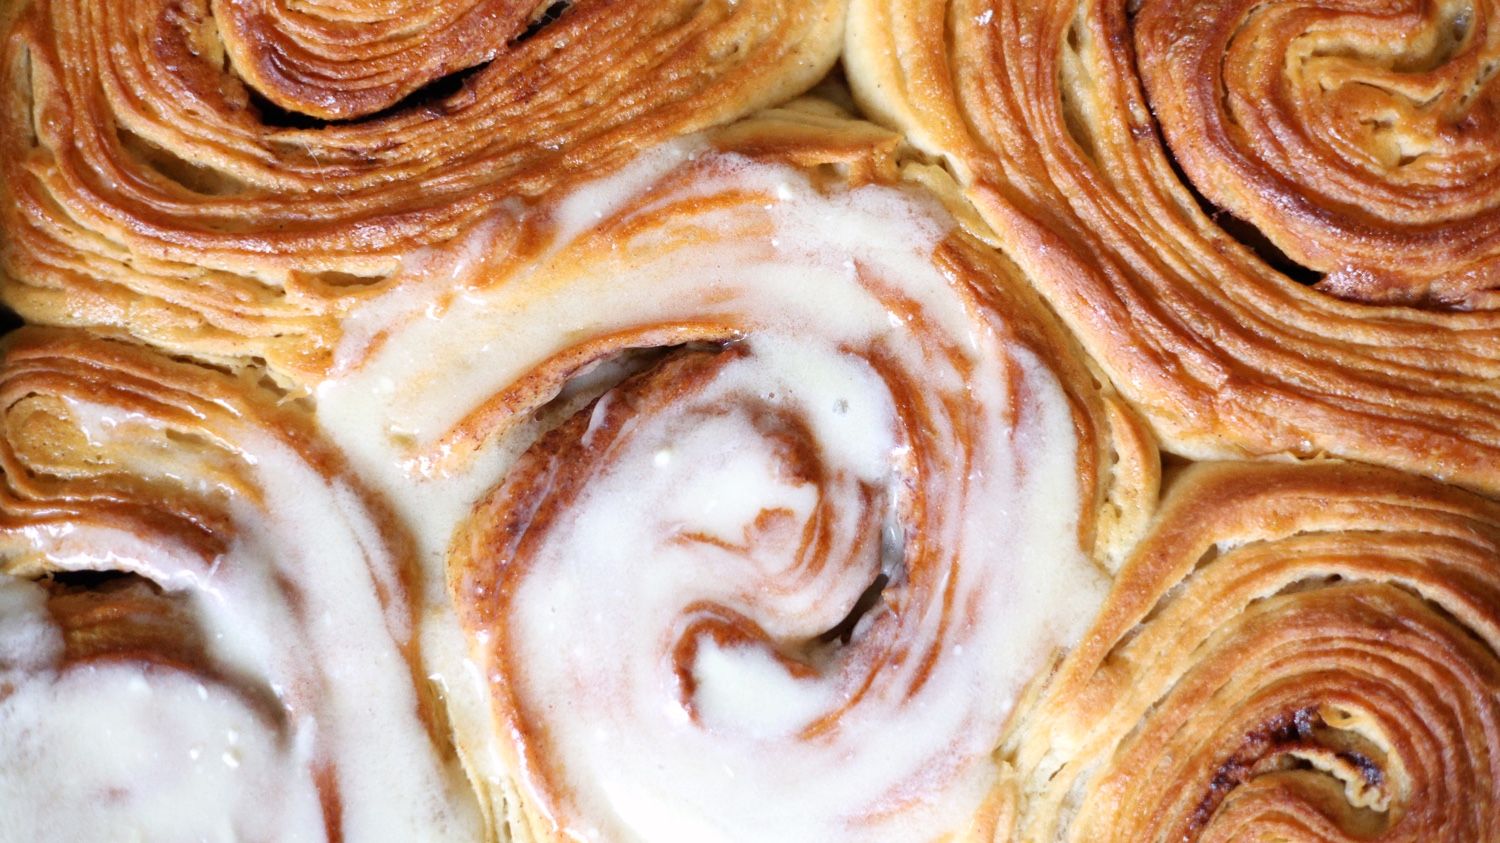
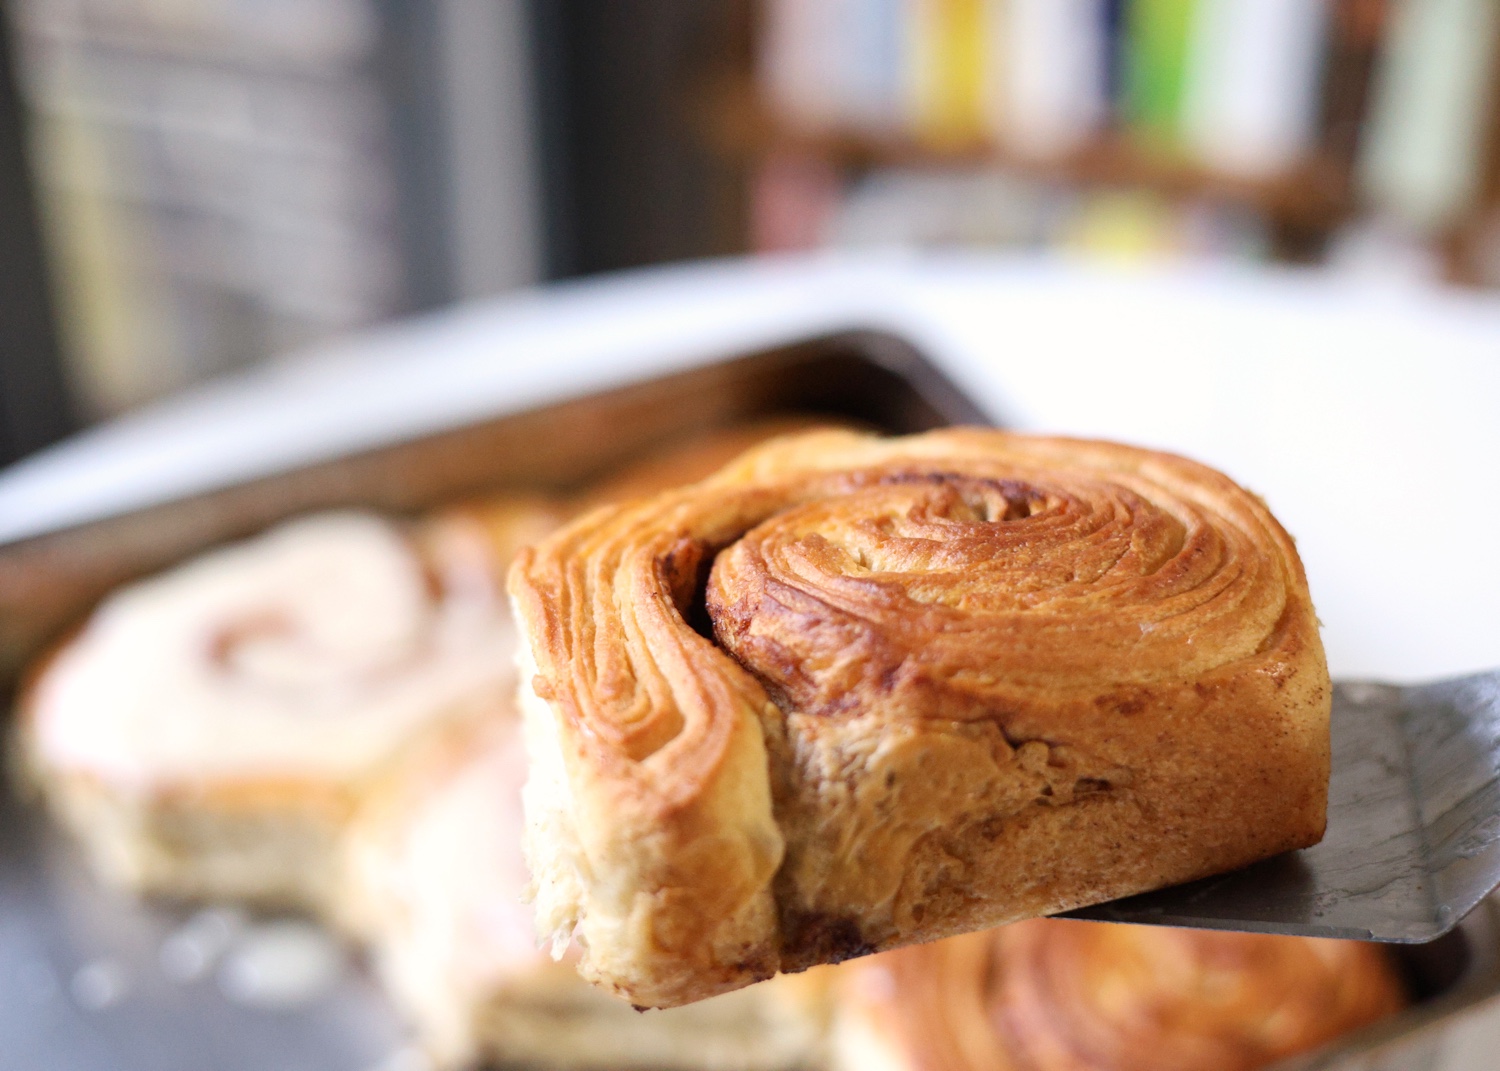
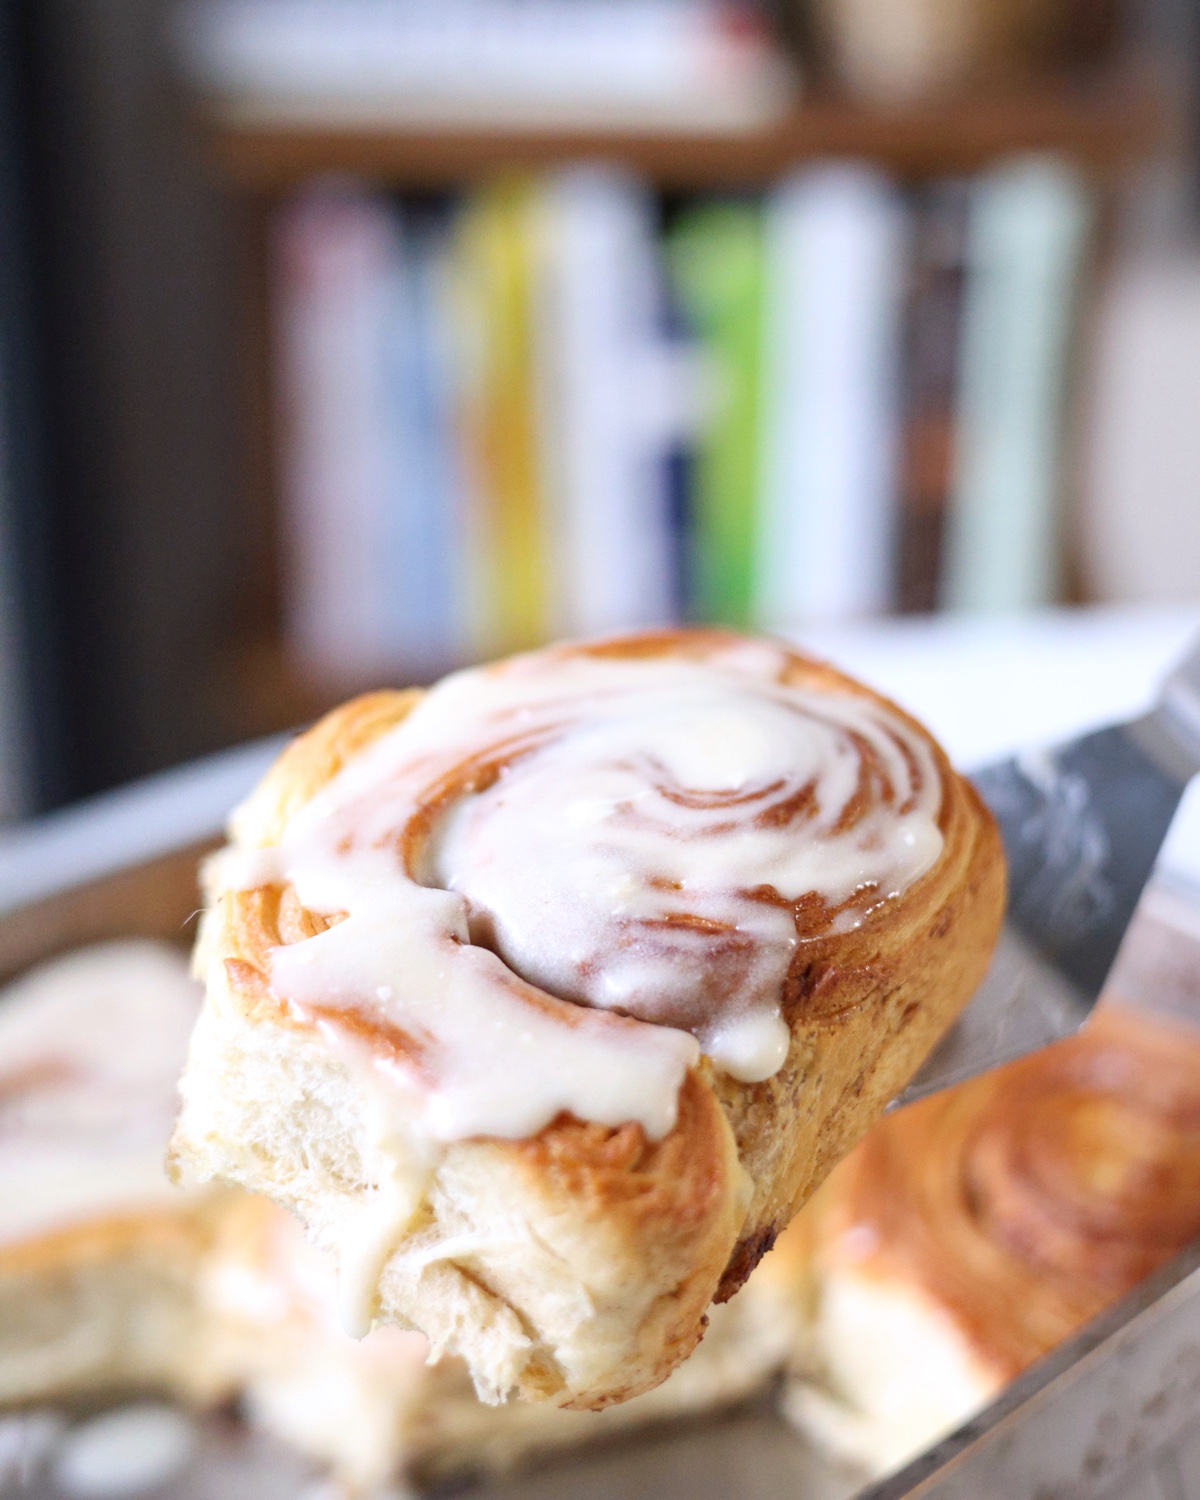
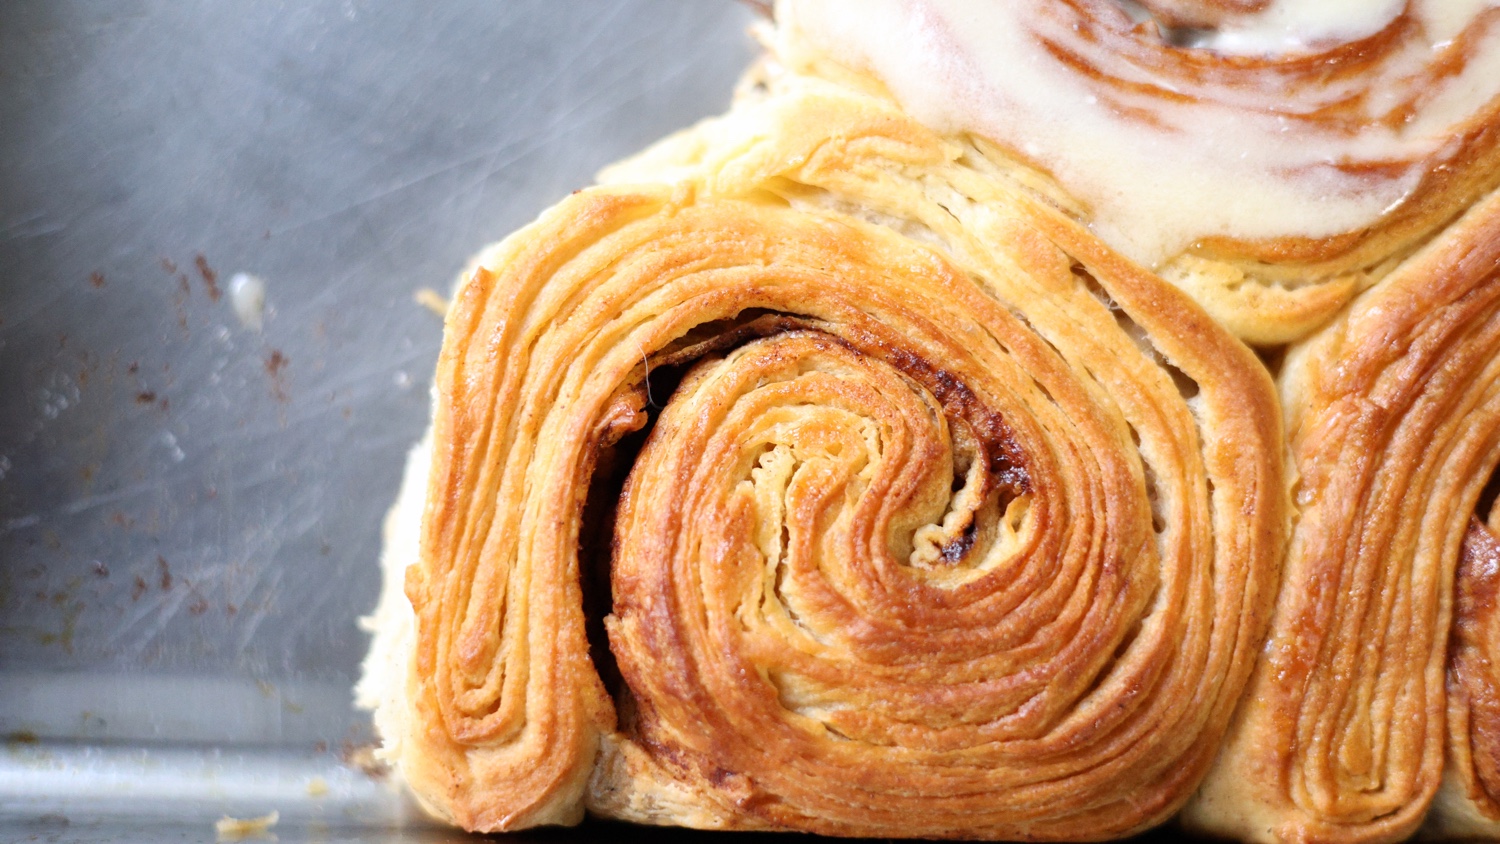
If you’ve ever dreamed of making vegan croissants at home but weren’t sure where to start, these flaky, buttery, and gooey vegan croissant cinnamon rolls are the perfect beginner-friendly pastry to try. They combine the rich, laminated layers of puff pastry or croissant dough with the soft, sticky cinnamon swirl of classic cinnamon rolls, all topped with a luscious dairy-free cream cheese icing.
I know it feels overwhelming to make croissant dough at home, but once you understand the process and do it once, you'll never go back! Learning the basics of the dough with a simpler treat like cinnamon rolls will hone your baking skills and get you ready for baking perfectly flaky and buttery vegan croissants with the exact same dough.
The best part? You can split the process into two days to make it easier, or complete it in just one day if you’re up for the challenge! Once you’ve mastered this recipe, you’ll be well on your way to making vegan croissants, Danish pastries, and puff pastry dough from scratch and you'll never go back to the store-bought kind again.
Nothing has given me a prouder moment in the kitchen than to see the buttery layers of all that hard work come to life in the oven.

Why You’ll Love These Vegan Croissant Cinnamon Rolls
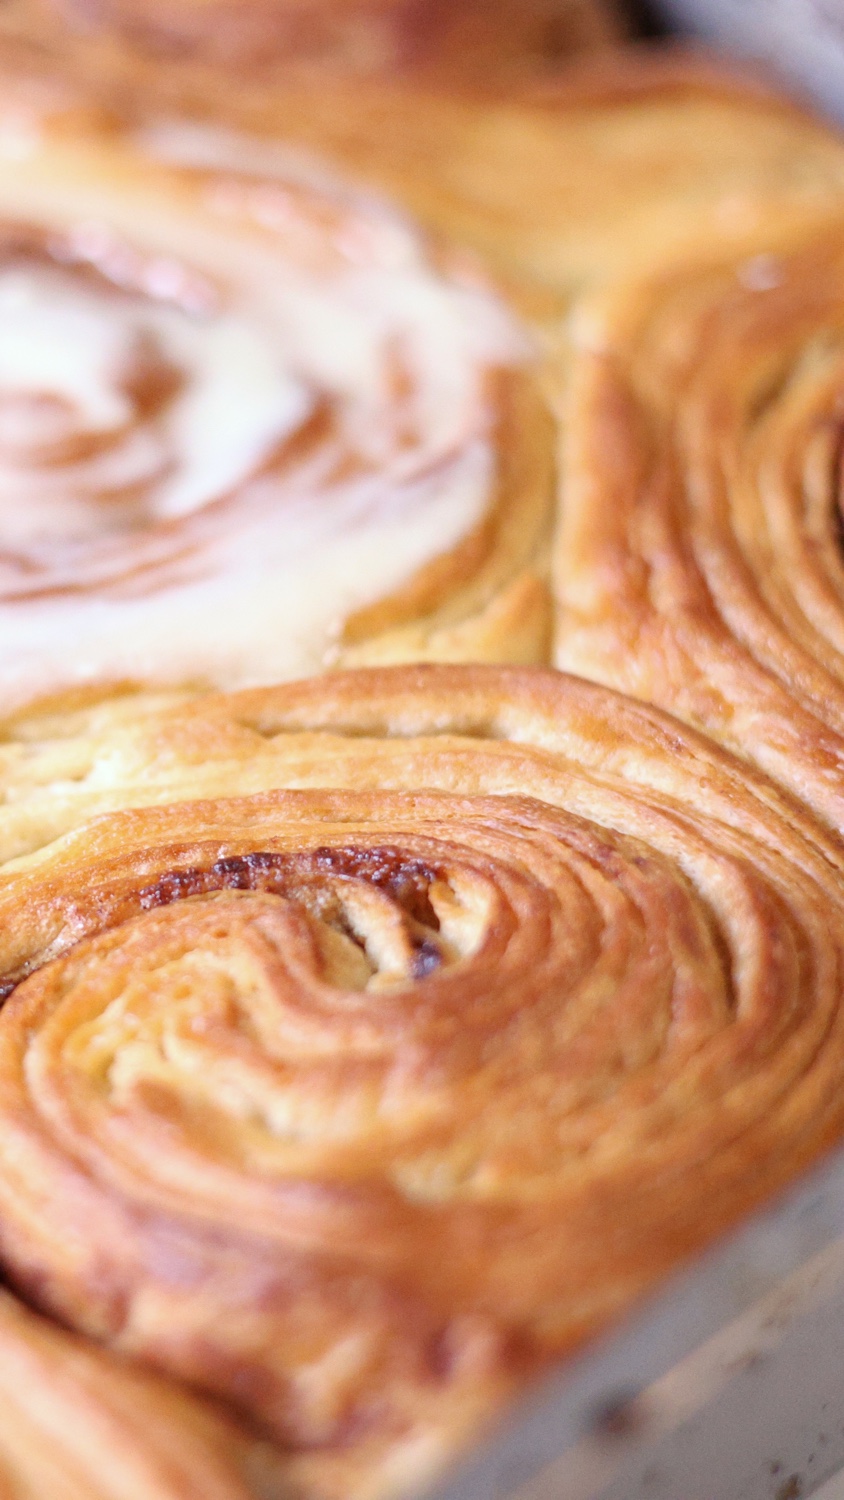
✔ Gooey and super soft inside, golden, layered, crispy & flaky outside
✔ Made with homemade vegan croissant dough
✔ Perfect for learning more advanced pastry skills
✔ Easier than traditional croissants
✔ Dairy-free & 100% plant-based and vegan
How to Make Vegan Croissant Cinnamon Rolls
(If choosing the 2 day process)
Day 1
Step 1: Make the Croissant Dough
-
In a standing mixer, knead all the dough ingredients together for about 12-14 minutes (you can also knead by hand if you don't have a standing mixer).
-
Let the dough rest for 30 minutes.
-
Roll out the dough over parchment paper to form a 50 cm (19.7 inch) x 30 cm (11.8 inch) rectangle. Place another sheet of parchment paper over it, fold your dough, wrap it, and place it in the freezer until the following day (or up to two weeks until you're ready to make cinnamon rolls or croissants).
Why do we freeze the croissant dough?: The reason we freeze the dough if doing the process over two days is to temporarily halt the fermentation process, so that the yeast taste isn't as present as if you were making bread. Traditional croissants have a milder, more buttery taste, so by halting the fermentation until you're ready to use your dough, you'll achieve that perfect croissant taste. This step isn't necessary if you're doing the entire process over one day as you'll see below.
Day 2
Step 1: Take out the Dough from the Freezer
- Take the dough out of the freezer about 30 min before you'll continue the process, and let it thaw on your counter.
Step 2: Prepare the Dairy Free Butter Layer or "Beurrage"
- Take out your block of non-dairy butter and roll it out between two pieces of parchment paper to create a 30 cm (11.8 inch) x 30 cm (11.8 inch) square.
- Place it in the fridge for 30 minutes while your dough continues to thaw.
Step 3: Laminate the Dough (Croissant Layers!)
-
Smooth out the dough: On a floured surface or a piece of parchment paper, smooth out the thawed dough with a rolling pin (you should have a 50 cm (19.7 inch) x 30 cm (11.8 inch) rectangle.
-
Encase the butter: Place the butter beurrage to cover 3/4 of the dough, fold in the small border on three sides to encase it, and fold the opposite side of the dough a third of the way towards the center and then fold again to meet the other edge (as if you were folding a letter).
- Turn and roll: Turn the folded dough 90 degrees counterclockwise, and with a knife cut two slits on the sides with the rounded fold (the side that now faces you and the opposite side), and roll out the dough to form a rectangle just like you did before.
-
First fold & rest: Fold in the same way you did previously (as if you were folding a letter in thirds). Cover with parchment paper and let it rest on your work surface for 45 min.
-
Turn and second fold and rest: Turn the dough 90 degrees counterclockwise, roll it out once again and fold in the same way you did previously (as if you were folding a letter in thirds). Cover with parchment paper and let it rest for 45 min.
(💡 TIP: Getting a silicone mat with measurements is so helpful for rolling out this dough, I love this one, but you can also use a ruler or a tape measure, just make sure to flour your work surface well).
Step 3: Assemble the Cinnamon Rolls
-
Roll out the laminated dough into a 50 cm (19.7 inch) x 30 cm (11.8 inch) rectangle.
-
Combine the melted or softened non-dairy butter, cinnamon and sugar and spread it over your dough (leaving a bit for the bottom of the pan).
-
Roll up tightly starting from the longest side to form a long log and cut your cinnamon rolls using unflavored dental floss for a perfect cut (or use a knife). Cut into 8 rolls. Grab the largest oven pan or baking dish you have and add the leftover cinnamon butter on the bottom and place your cinnamon rolls inside with space between them.
- Let the cinnamon rolls rise for 1-2 hours or until doubled in size.
Step 4: Bake to Perfection
-
Pre-heat oven to 350°F (180°C).
-
Brush the rolls with the no-egg wash.
-
Bake covered with foil for 30 minutes, then uncovered for 20 minutes until golden.
Step 5: Make the Dairy-Free Cream Cheese Icing
-
In your standing mixer (or with a handheld mixer, or even by whisking by hand), whip up the butter and cream cheese, add the rest of the ingredients and whip until perfectly smooth.
-
Once your cinnamon rolls have cooled slightly, slather each one with the icing and immediately dig in!
How to Make Vegan Croissant Cinnamon Rolls
(If choosing the 1 day process)
- Follow the exact same process stated above, but omit the freezing of the dough.
- Simply refrigerate the dough while you're making the butter beurrage layer and chilling it, then remove both from the fridge and continue the layering and folding process.
Serving & Storage Tips
🍽 Best served warm – Slather with the dairy free cream cheese icing while they’ve cooled slightly but are still a bit warm!
❄️ Make-ahead tip – Just like you can make the dough the day before (or even 2 weeks in advance!), you can also make the icing the day before, refrigerate and simply re-whip or re-whisk before slathering over the rolls.
🧊 Storing leftovers – Keep in an airtight container for up to 4 days, or freeze baked rolls for up to a month.
Pro Tips for Flaky & Gooey Vegan Croissant Cinnamon Rolls
✔ Use a bread flour that preferably has a 12-13% protein content – This will give you a strong enough dough to make the layering process easier, and give you a perfect dough to work with.
✔ Pause your standing mixer from time to time while kneading – This is a tough dough, so give your machine a break while kneading so as not to overheat it.
✔ Use high-quality vegan butter from sticks, not tubs – Brands like Miyoko’s or Violife, or any brand that is very firm when cold and comes in sticks or bars, work best for laminating and will prevent the butter from slipping out when layering and laminating.
✔ Don’t rush the process – Taking your time with these is what gives you those perfect layers.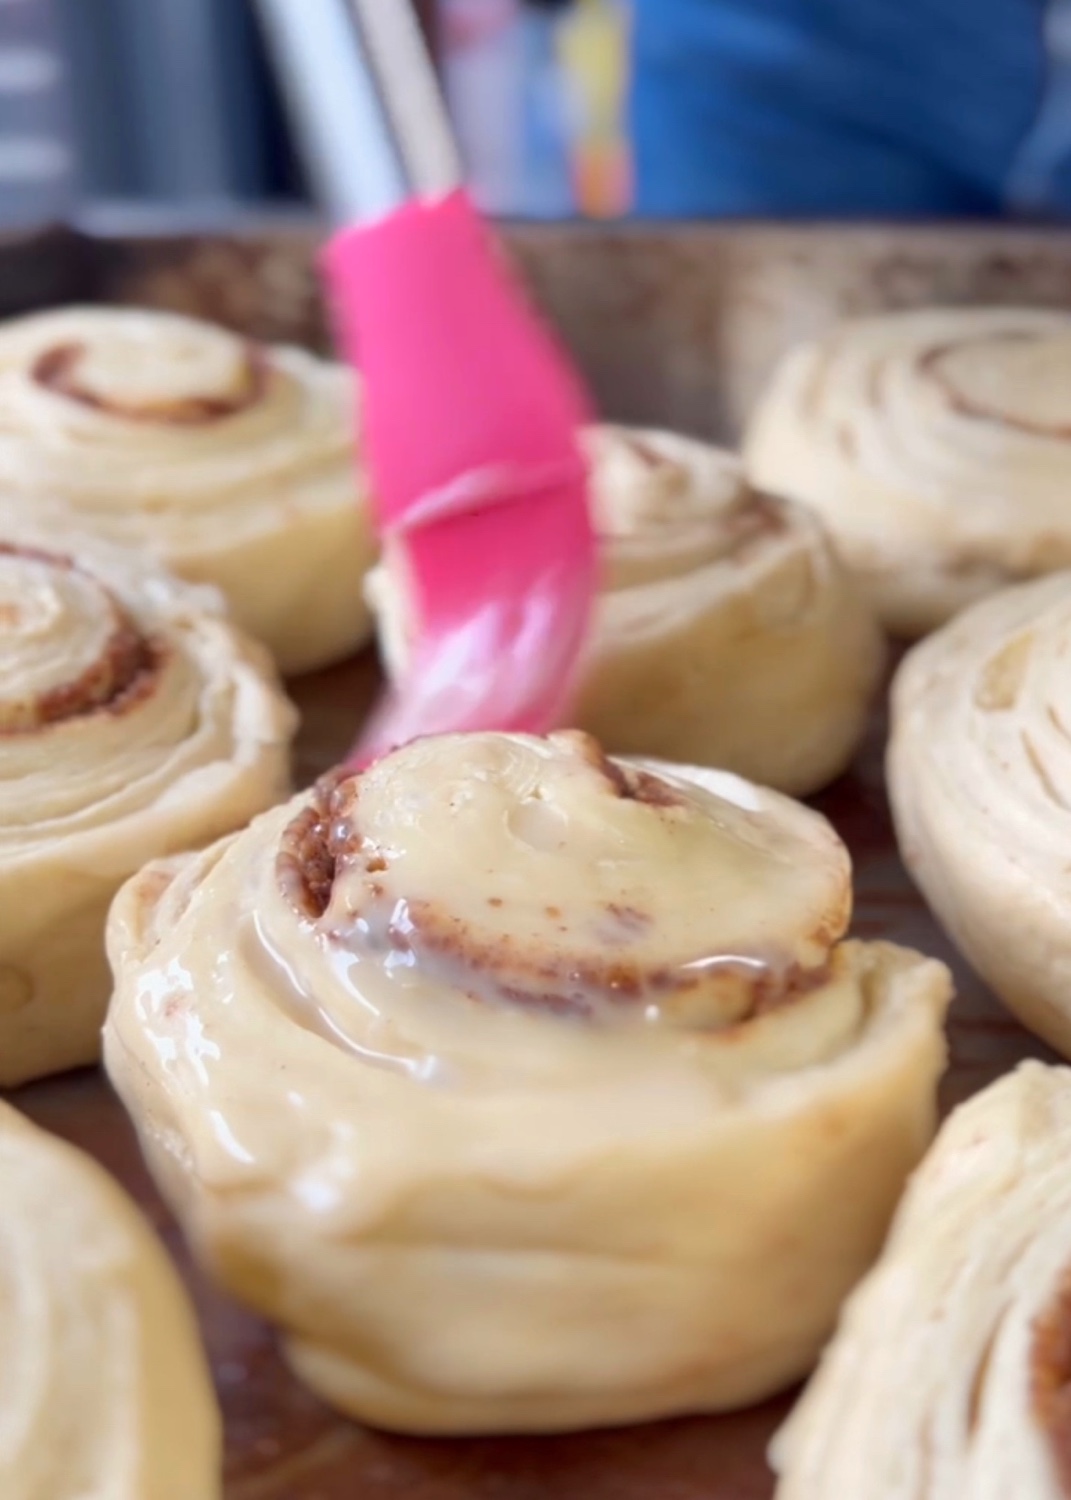
Master Vegan Pastries and Plant Based Cooking with Us!
If you’ve always wanted to make vegan croissants or puff pastry, this recipe is the perfect way to start! And if you’re ready to take your plant-based cooking and baking skills to the next level, our online vegan cooking school offers expert-led courses on everything you need to know to become an incredible home cook, with professional level techniques.
👉 Join our online vegan cooking school today and start mastering plant-based cooking and baking, or send our cooking classes to someone you love.

FAQs
Can I make the dough ahead of time?
Yes! After rolling it out, you can freeze the dough overnight (or up to two weeks) and finish the process the next day or when ready to bake.
What’s the best vegan butter for croissant dough?
Look for high-fat vegan butter from sticks or bars that stays really firm when cold, such as Miyoko’s or Violife—they work best for lamination.
Can I freeze these cinnamon rolls?
Absolutely! Freeze the first part of the dough before laminating to break the process into two days, or freeze the baked cinnamon rolls to enjoy whenever you're craving a sweet treat.
What can I do if my butter is slipping out when layering?
This can happen if the butter you're using isn't as high in fat, or is soft and spreadable when cold, or if it's very hot when you're making these. One way to help prevent this if this is the case is to chill your dough between the 45 min resting times. It will be a bit harder to roll out the dough, but it will harden the butter slightly. Getting the right dairy-free butter as stated above is important though, just try to get the highest one in fat content and the firmest one when chilled.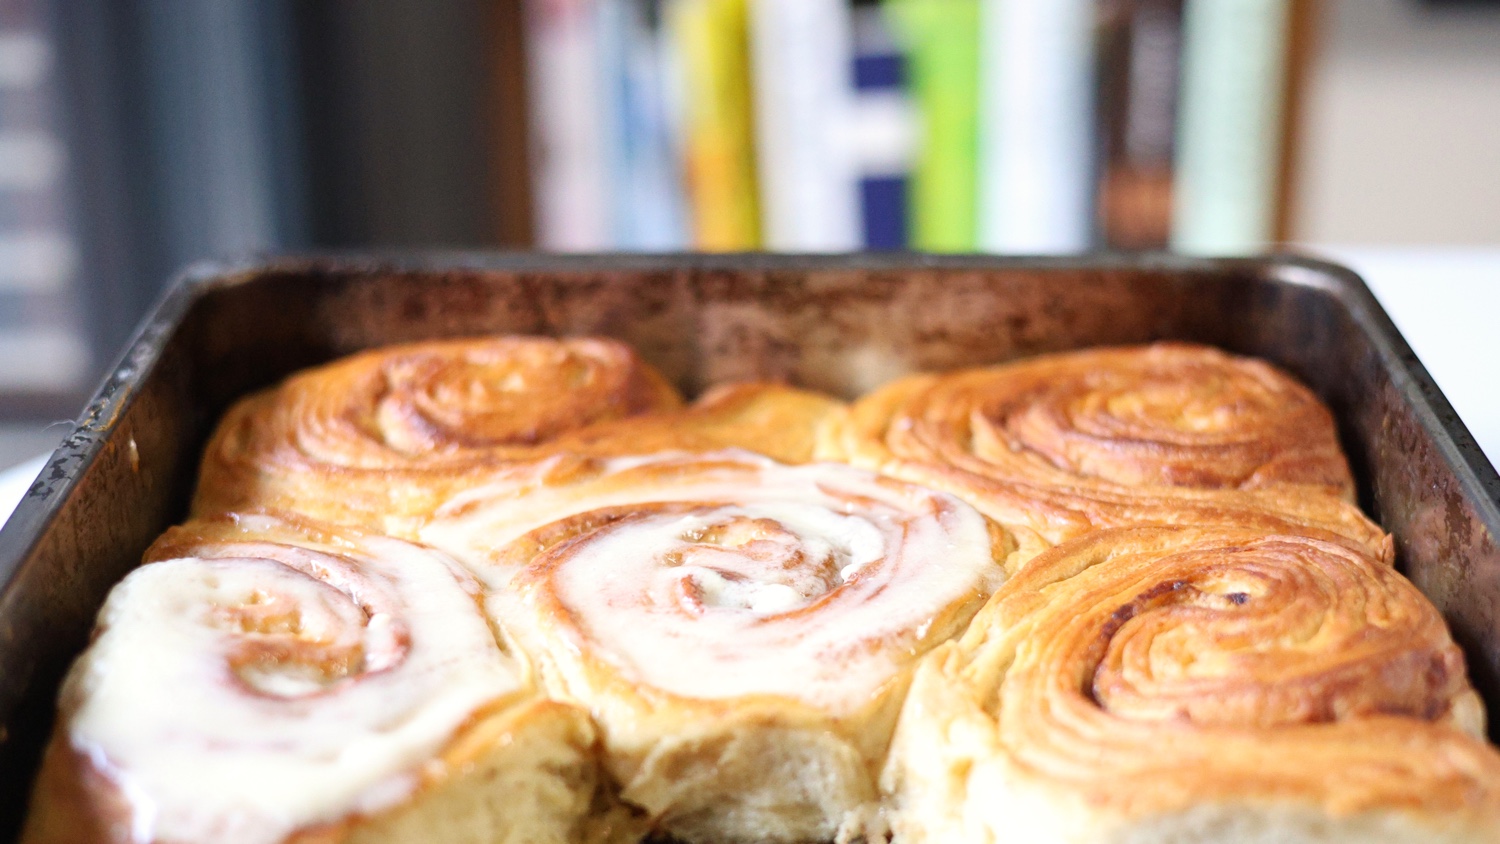
Are you ready to make your vegan baking dreams come true? Enjoy the printable recipe, video and written recipe below.
PDF RECIPE

FLAKY VEGAN CROISSANTCINNAMON ROLLS
Yield: 8 huge cinnamon rolls | Prep Time: Split the process into two days or make all in one day (most steps are just a few minutes, with several resting and chilling or freezing times in between as stated in the recipe) | Cook time: Covered for 30 minutes, then uncovered for 20 minutes
Ingredients
For the croissant dough:
- 750 grams (26.5 oz) bread flour (try finding a flour that is at least 12%-13% protein, for the best structure)
- 14 grams(0.5 oz) salt
- 120 grams (4.2 oz) sugar
- 375 grams (13.2 oz) soy milk
- 50 grams (1.8 oz) non-dairy butter (from sticks, not tub)
- 35 grams (1.2 oz) fresh yeast
For the beurrage and croissant layering:
- The dough from above
- 250 grams (8.8 oz) non-dairy butter
For assembling the rolls:
- 1 tablespoon cinnamon
- 1/3 cup brown sugar
- 100 grams (3.5 oz) non-dairy butter (melted or softened)
- 1 tablespoon non-dairy heavy cream
- 1 tablespoon maple syrup
For the icing:
- 75 grams (2.7 oz) non-dairy butter (from sticks, not tub)
- 150 grams (5.3 oz) very cold non-dairy cream cheese
- 2 cups confectioner’s sugar, sifted
- 1/4 teaspoon vanilla extract
- 1 & 1/2 tablespoons cornstarch
Directions
Day 1 (Making the vegan croissant dough):
- Combine the flour, salt, sugar and yeast in the bowl of a standing mixer and add the 50 grams non-dairy butter. Knead using the dough hook for 12-14 minutes, giving the machine a couple of breaks along the process (it’s a tough dough!).
- Do a membrane test by taking a bit of dough and stretching it out slowly with your fingers. If it’s stretchy and doesn’t tear it means the gluten has been developed correctly. If it tears too fast, knead for a little bit longer.
- Place the dough in an oiled bowl, cover and let the dough rest for 30 min., out of the fridge.
- Roll the dough out over parchment paper until you have a 50 cm / 19.7 inch x 30 cm/ 11.8 inch rectangle. Cover with another sheet of parchment, fold the dough, warp it well and place in the freezer overnight.
Day 2 (Layering the dough and making the cinnamon rolls):
- Take the dough out of the freezer about 30 minutes before you’ll start the rest of the process.
- Fold a piece of parchment paper so that it forms a 30 cm /11.8 inch x 30 cm /11.8 inch square. Place the 250 grams of non dairy butter on it with another piece of parchment over it and press with a rolling pin and spread it out until it fits that shape. Fold the sides of the parchment to cover it or add another piece of parchment paper on top and place this in the fridge for 30 minutes.
- Roll out the thawed dough, place the butter layer on top towards the edge and tuck in a bit of a border with the edge of the dough.
- Fold the opposite side of the dough a third of the way towards the center and then fold again to meet the other edge.
- Turn the dough 90 degrees to the right and roll it out. Fold in the same way you did previously (as if you were folding a letter in thirds). Cover with parchment paper and let it rest for 45 min.
- Turn the dough 90 degrees to the right and roll it out again. Repeat the folding. Let rest for 45 minutes.
- In a bowl mix the cinnamon, 1/3 cup brown sugar and the 100 gr of melted (or softened) non-dairy butter. Whisk to combine.
- Roll out the dough one last time and coat with the cinnamon butter (leaving a bit of cinnamon butter for the bottom of the pan. Roll your dough tightly to form a long log of cinnamon rolls.
- Using unflavored dental floss (or a knife) cut your rolls and place them over a bit of extra cinnamon butter in a very large oven proof pan (leave space between each roll).
- Cover the pan and let the cinnamon rolls rise for 1-2 hours or until doubled in size.
- Whisk together your “egg” wash by combining the tablespoon of non-dairy heavy cream and the tablespoon of maple syrup, brush over the rolls. Pre-heat the oven to 350ºF (180ºC).
- Cover the pan with foil and bake for 30 min covered, then 20 min uncovered.
- Let them cool slightly, whip the icing in a standing mixer until smooth and creamy, slather over each roll and enjoy warm!
NOTE: If making the cinnamon rolls in just one day, simply:
- Follow the exact same process stated above, but omit the freezing of the dough.
- Simply refrigerate the dough while you're making the butter beurrage layer and chilling it, then remove both from the fridge and continue the layering process.
These vegan croissant cinnamon rolls are a must-try for pastry lovers! Flaky, gooey, and topped with a luscious dairy-free cream cheese icing, they’re perfect for learning how to make vegan croissant dough at home. Once you master these, you’ll be ready to tackle vegan croissants, Danish pastries, and puff pastry like a pro!
Want to become a plant-based cook by learning both vegan baking and savory cooking? Join our online vegan cooking school and take your vegan baking and cooking skills to the next level.

🧑🍳
You might also like...
Our Online Cooking School and Courses
Don't miss our weekly goodies!
Our best FREE content straight to your inbox

